- Published Dec 9, 2013 in Music 101
That studio is costing you a bundle. So make sure you walk in with good charts. You'll save time, money, frustration and your good reputation.
Because studio time is always at a premium, it is critical to walk in prepared. As an arranger, producer or leader, one of the smartest ways of accomplishing this is to have charts prepared and ready to go for all the musicians on the rehearsal or session.
There are several standard ways to write charts, and you need to consider who’s going to be reading them. Let's briefly discuss some of the ways to write readable charts, oriented to various levels of sight reading ability.
Start with a road map.
Before you even decide what format the chart is going to take, you need to come up with a road map for the tune. This might look like:
Intro / Verse 1 / Verse 2 / Chorus /
 Verse 3 / Bridge / Chorus /
 Solo / Verse 4 / Chorus / Repeat / Tag
Once you have your basic form, you can proceed to flesh out the sections, either with (1) simple chords; (2) chords over rhythmic bars to delineate the duration of each chord; (3) a Nashville number-chart which can be played in any key without transposition; or (4) a more involved chord chart with scored melody and harmony lines beneath it on a staff, as well as dynamic markings and other qualifiers.
Simple chord chart.
To create a basic chart:
- Use your synopsis of the song to determine the order of the sections as they naturally occur.
- Put a key signature at the top of the page.
- Use a time signature (e.g. 4/4, 3/4, 6/8) to signify the number of beats per bar and which note will stand for one unit of measure.
- Use repeat markings to signify a verse or chorus repetition, in order to avoid rewriting any given section.
- Use abbreviations for the various parts of the form (i.e. I for Intro, V for Verse, B for Bridge, C for Chorus, etc..)
- Chords are generally written in uppercase with qualifiers (e.g. maj, min7, b5, add9, etc). For instance, A min9 or F maj7.
In this basic format, the chord changes are just written down on paper and the musicians are left to figure out the rhythm and duration of the chords in rehearsal, which leaves the execution of the tune to trial and error in a sense. But at least the players can see the key, note the changes and take it from there.
I don't recommended this method for more involved chord charts, where the rhythmic details really need to be in the chart, along with tempo changes and stops. If the musicians involved already have some grasp of the tune, however, it will suffice to get them through a rehearsal.
Chord charts with rhythm markings.
With this chord chart, we also include a key signature, time signature and the chord changes, but also crucial to this form are the rhythm markings below the changes, designated with back slashes:
Am  G/B  Cadd9
/    /    /   /
With this method of charting the tune, the player is meant to understand that, in this bar, with 4 beats to the measure, the Am chord gets one beat, followed by one beat of G/B, followed by 2 beats of Cadd9. These three changes comprise one bar in 4/4 time.
The Nashville number system.
It now becomes a mental exercise for the player to make the changes in any given key.
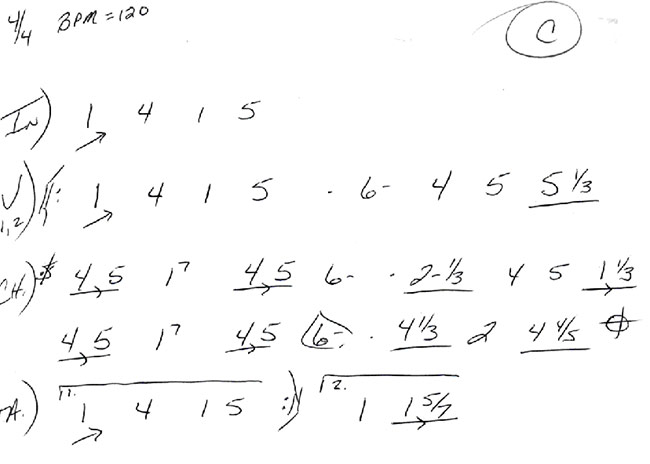
The Nashville number system is an ingenious method for charting a tune numerically, with which one can play any given tune in any key without having to switch charts.
The numbers and their qualifiers simply represent the chord symbols in any respective key (e.g. 1, 4, 5, 1). We call the root of the key 1 and the rest of the notes in the scale are named numerically (2-7 and then we start over) according to their relative position to the root.
For example, in the key of C, D minor would be known as 2 and F would be known as 4. It now becomes a mental exercise for the player to make the changes in any given key. This method takes some practice and some real chops, but once perfected, it's a very efficient way of utilizing a minimal songbook for a variety of singers who need to sing the tune in a variety of keys.

The Nashville number system replaces specific chords with numbers that represent how each chord relates to the key of the song. This makes it easy to change keys.
Giving your song a full score.
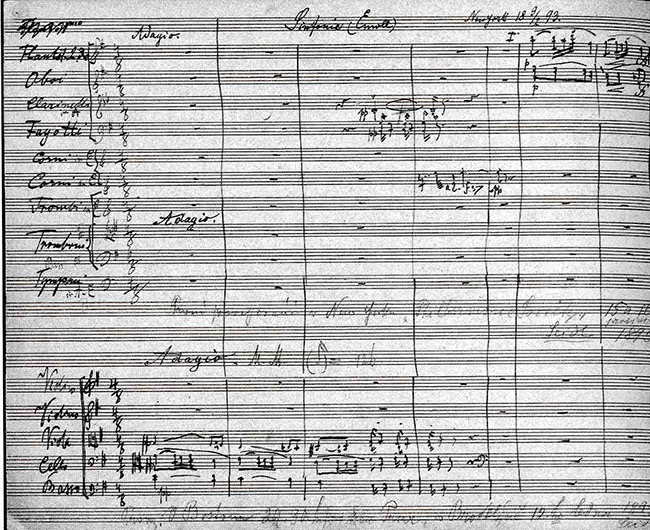
Finally, there's the more traditional method of actually scoring a chart with melody, harmony and counterpoint lines, leaving virtually nothing to guesswork. Even the bass, drum and solo lines can be written note for note, helping to assure that the song is going to work rhythmically and harmonically.
The composer/arranger does all the pre-production work on the tune ahead of time, and then the players simply play from the individual parts derived from the score, or read the score itself.
This does presuppose that the musicians are fluent readers, though not all musicians are at this level. But, for a majority of professionals, this is the tried and true method. It's fast, cost-effective and it certainly makes the most efficient use of studio time.
 Photo: Public Domain via Wikipedia Commons
The first page of Dvořák's ninth symphony shows a full score with notation for each instrument. For easier reading, each individual part can be copied onto its own chart.
Whichever method of charting you select, it is always important to remember to write the chart legibly, visibly, proofread your work and edit out the mistakes—then check it again.
You'd be surprised how inspiration and positive energy are sabotaged in the recording studio with badly written charts. This shouldn’t have to happen. Time is money and preparation for a smooth recording session is simply a smart move. You're saving everybody else's time and effort as well! More importantly, you're making a favorable impression that’s going to get you the return call for the next session.

