
-
By Mike Rivers

- Published Sep 2, 2013 in Gear Garage
Overview of ways to improve your sound and work smarter with alternatives to basic audio interfaces.
In Part 1 we toured operating levels, impedance, and common interfaces between the microphone and computer. In Part 2, we'll look at alternatives to the basic sound card, how they can improve your sound, help you to work smarter, and solve problems which you may have not yet encountered.
Mixers
Mixers come in many shapes and sizes. Most familiar is the stand-alone box with a bunch of inputs, outputs, and controls. A mixer's fundamental function is to combine signals from several sources into a single output. Beginners are often overwhelmed (and visitors are impressed) with the number of knobs and buttons on a mixer, but once you recognize that the same set of controls is duplicated for each input channel, it's not such a handful. Let's look at the signal flow through a basic mixer.
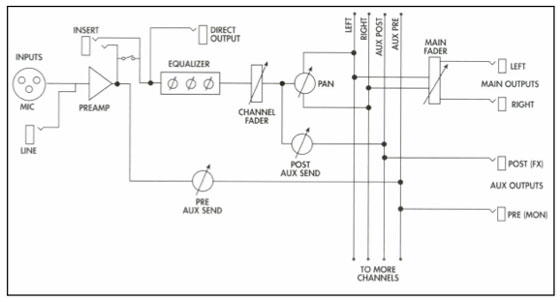
Most mixers are designed to take microphone inputs, so the first thing the signal encounters is a mic preamp. There's typically a line input, and occasionally an instrument input as well. There are line level only mixers (no preamps), and mixers that have a mixture of mic/line inputs line-only inputs, often configured as stereo pairs with the two line inputs adjusted by one set of channel controls.
Next in the signal path is usually an equalizer section where the frequency response can be tweaked. The channel fader that follows is used to adjust the volume the channel's source in the mix. Assuming that it's a stereo mixer (most are), after the fader, the signal is split to the left and right buses. The pan control adjusts the level going to each bus. The busses are where the mixing takes place. The master fader adjusts the volume of the left and right mixes, and this is the output which feeds your sound card inputs.
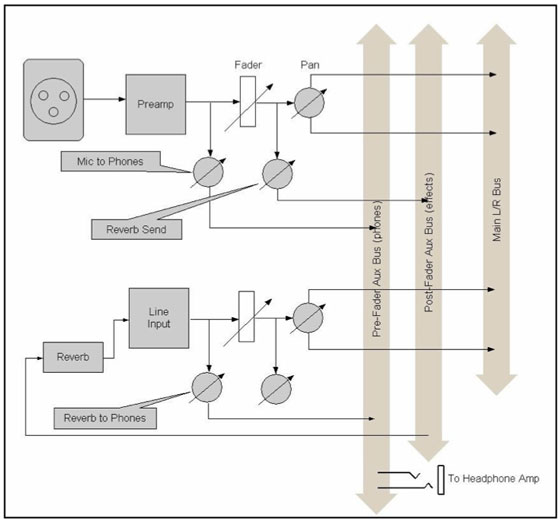
That's the basics, but wait! There's more! Auxiliary sends are the outputs of additional mixers within the box with which you can create alternate mixes of the channel inputs. They're typically characterized by the point in the signal path where the channel signal is taken. A pre-fader auxiliary mix uses the signal tapped off before the channel fader and often before the EQ section as well. The level of this signal is adjusted by the channel's pre-fader auxiliary send control, and then sent on to a bus where it's mixed with similar signals from other channels. A pre-fader output is usually used to feed a headphone mix (or stage monitors for a PA system). The reason for this independent mix is that often a musician playing in the studio or on stage will want to hear certain things louder (or quieter) as an aid to his playing. By having an auxiliary mix, you need not change the mix that you're sending to the audience or to the DAW for recording.
A post-fader auxiliary send is similar but since the signal is taken after the channel fader, the signal level going to the post-fader bus is controlled by both by the channel fader and the channel's post-fader aux send control. Post-fader sends are usually used to feed effect processors since you usually want the level of the effect in the mix to be in proportion to the level of the channel signal.
Sometimes you really need a mixer. For example if you're recording a full band or even a drum kit using more than two microphones and your sound card has only a stereo input, you'll need to mix those mics prior to recording. If you're making a multitrack recording one track at a time, however, bypassing some of the mixer's electronics and connecting the sound card's input directly to the mic preamp output will give you (in theory, and sometimes in practice) a cleaner recording. This is the purpose of the Direct Output. Your mixer may or may not have one.
Often a mixer will have an insert jack which immediately follows the mic preamp. This is both an output and an input in line with the channel signal path. With nothing plugged in, switch contacts on the jack maintain the signal path continuity. Inserting a plug opens the contacts allowing a signal processor such as a compressor to be patched in line with the channel signal. The "send" half of an insert jack can double as a direct output by inserting a plug half way so the switch contacts don't open.
There's usually a headphone jack which may have its own volume control, separate outputs for monitor speakers, more auxiliary send buses, subgroup buses, inputs for playback from a sound card or other stereo sources, and auxiliary returns from the output of effect processors. You can learn a lot about your mixer, or one you're contemplating purchasing, by studying its block diagram.
We often think of a mixer as a large and expensive centerpiece of a studio, but In the DAW era, mixers don't always have mixing as their primary function. Today we're seeing small mixers with only a few inputs, but with most of the bells and whistles of a full blown studio console. When properly interconnected, such a mixer is makes a great control center for the studio.
Digital Connections
Digital Audio Data Formats
In Part 1, we surveyed the most common analog signal characteristics and connections. Given that the average built-in sound card is worth about ten bucks and high quality stereo A/D and D/A converters run in the $1,000 range, you might suspect that using a sound card with digital inputs and outputs and doing the conversions with outboard hardware might improve your system's audio quality – and you would be right. To do so, however, you'll need to make digital connections between the converters and the sound card.
There are many digital audio interface standards and protocols. The most common ones are AES/EBU and S/PDIF (more accurately called AES3 and IEC-60958 respectively, but don't expect your dealer to know that). Both are stereo formats – two channels on a single cable. AES/EBU connections are balanced and use a single XLR connector. S/PDIF comes in two flavors; coaxial, using RCA phono connectors, and optical, using Toslink fiber optic connectors. IEC-60958 defines professional (type I) and consumer (type II)data formats, both carrying audio data in the same format but differing in how they handle copy protection and other non-audio data. Coax-to-optical converters and S/PDIF coax-to-AES/EBU adapters are available and usually work well, but it's best to use matching hardware and avoid kludges.
First generation digital I/O audio hardware was limited to 48 kHz sample rate, but it didn't take long to outgrow that. Early 96 kHz AES/EBU implementations used two XLR connectors ("double wire"), each carrying one channel. Eventually faster hardware was developed to accommodate 96 kHz audio on a single cable. 192 kHz is handled on an ad hoc basis – some devices pass it, some don't.
The ADAT Optical digital interface, commonly called "ADAT Lightpipe," uses the same Toslink fiber optic connectors and cable as S/PDIF optical, but thanks to a clever interface chip design, carries eight audio channels at up to 48 kHz sample rate. Alesis originally developed this interface to connect their ADAT 8-track digital recorders, but it's been adopted by so many other makers of multichannel digital audio gear that it's essentially a de facto standard. The S/Mux extension to the ADAT Optical interface evolved to accommodate higher sample rates, carrying 8 channels of 96 kHz audio on two ADAT Lightpipes.
TDIF, developed by TASCAM for interfacing their 8-track digital recorders, is a bi- directional interface with eight input and eight output channels on a single 25-pin D-Subminiature (DB-25) connector. This uses a protocol similar to S/PDIF coax.
The DB-25 connector is also used for multiple AES/EBU channels. There are enough pins to carry four stereo inputs and outputs on a single connector, but not every manufacturer does that. The industry hasn't yet settled on a standard DB-25 pinout for AES/EBU - Mackie and Yamaha, Digidesign, Otari, and iZ Technology (RADAR) each use their own wiring convention. Beware when connecting digital devices from different manufacturers that use what appears to be the same connector.
AES50 and MADI are two newer multichannel audio interconnection formats capable of carrying 48 channels or more at 96 kHz on a single cable. This is still pretty high end stuff so we'll leave them for another article.
Data Synchronization
When interconnecting digital devices, their internal clocks must be synchronized so that each data bit is received at exactly the time it's expected. We use a signal called word clock for this.
Most AES/EBU and S/PDIF interfaces can be configured (usually with a hardware or software switch) so the receiver synchronizes its clock to the incoming data rate with no additional clock connections required. The ADAT optical specification has provisions for the receiver to use a word clock derived from the incoming data stream, but not all ADAT Lightpipe devices implement this feature. Self-clocking is fine for a simple system consisting of no more than two digital devices, but with multiple digital devices in a system, it's necessary to designate one device as the master word clock, and distribute that clock signal to each of the devices in the system.
The master word clock source can be the Word Clock Output on one of the devices, or an external clock generator that has no other purpose than to provide a word clock. Master clocks typically have multiple outputs so that there's no need to daisy-chain the clock signal, and most master clocks brag about having extremely low jitter. Word clock is normally connected using 75 ohm coaxial cable with BNC connectors.
Ideally, everything that sends or receives digital audio data should have both a word clock output and input, but not everything does – occasionally you'll need a word clock input and the device has none. Sometimes you can juggle the master/slave arrangement, but not always.
Update: Devices that are designed to connect directly to a computer via USB or Firewire typically are clocked by the computer, and therefore some manufacturers see no need for a world clock input or output connector. This can be confounding!
Computer Connectivity
A conventional sound card connects directly to a computer bus, either through an expansion connector on the motherboard or the motherboard may have the sound card integrated on board. There are some excellent aftermarket internal sound cards (forget the old netlore that internal sound cards can't be good because they pick up all the electrical noise floating around inside the computer box), but the popular approach today is to connect the sound card to the computer via an external bus. USB1.1 is universally supported, but due to its relatively low speed, it's only practical for 44.1/48 kHz sample rates. USB 2.0 is substantially faster and can easily carry eight or more 96 kHz inputs and outputs simultaneously.
Firewire (IEEE-1394) is more expensive to implement than USB so it tends to be found on higher grade audio hardware. While Firewire 400 and USB 2.0 both pass data at about the same rate, the Firewire chip performs much of the housekeeping work that, with USB, must be done on the host computer, resulting in more efficient data transfer and less CPU loading. Firewire 800 (twice as fast) is starting to appear, but audio manufacturers have been slow to adopt it. Same with USB 3.0. Read this again next year and see if I'm lying.
Analog-to-Digital, Digital-to-Analog, and A/D-D/A Converters
While A/D and D/A converters are an integral part all analog audio interfaces, they're also available as separate components, or as a single box performing both A/D and D/A conversion. While the A/D converter determines the fundamental accuracy of your digital audio (nothing that follows can make it any better), the D/A converter is equally important since it affects the accuracy of what you hear while you're working. Many people find that their mixes improve when they upgrade the D/A converter simply because they more accurately hear what they're doing.
The analog side of an outboard converter is usually balanced line level, and often switch selectable between +4 dBu and –10 dBV to facilitate connection to a wide range of gear. The digital side comes in all flavors – AES/EBU, S/PDIF Toslink and coax, in stereo and multi-channel versions.
Mic preamps with A/D conversion built in (or optional with a plug-in module) are quite popular, killing two upgrade birds with one stone. Typical configurations are a stereo preamp with AES/EBU or S/PDIF output, or eight preamps with ADAT optical output, but this is just the tip of the iceberg. Here are some other possibilities:
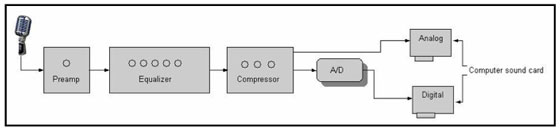
Channel Strips and Combo Boxes
The "channel strip in a box" grew out of the realization that many input channel functions got lost when the mixer disappeared from the studio. What we call a Channel Strip is usually one or two channels, rarely more. It includes a mic preamp, usually a line input, and sometimes an instrument DI. There's usually an equalizer section (often a fairly simple one), and frequently a compressor. An A/D converter may be included or optional. Modestly priced channel strips provide flexible control of the input signal, while more pricey "famous maker" channel strips can accurately recreate the sound characteristics of a vintage console without the bulk and cost.
The full featured computer audio interface ("Combo Box" for short) is a cross between a channel strip and sound card. The front end typically has a two or more mic/line inputs, perhaps an instrument input, and maybe even digital inputs. The box incorporates an A/D converter, and a USB or Firewire interface provides the connection to the computer.
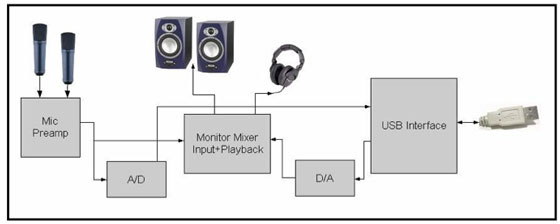
Since USB and Firewire are bi-directional interfaces, the typical combo box also includes the capability for playing back tracks from the computer for monitoring during overdubbing and mixing, Mixing the input source with the computer playback provides no-latency input monitoring when overdubbing. This block diagram shows an analog mixer, but often, particularly with multi-channel devices, the mixer is actually digital (because it's cheaper to build than an analog mixer).
Can You Hear Me Now? – Monitoring
Monitoring for playback and editing is pretty straightforward, but things get trickier once you start recording. You will probably feel more comfortable recording if you can hear yourself over headphones. Then after the first recording pass, in order to add more tracks, you'll need to hear both yourself and the previously recorded tracks so you can play along in time. With flexible signal routing between inputs, outputs, and headphones or speakers it's easy to hear the right mix to help you give the best performance.
A basic sound card is capable of simultaneous playback and recording, but the buttons and controls needed to mix the live input and playback are sometimes difficult to find, unintuitive to operate, or may not exist at all. Further, you may need more than a single monitor output. The engineer in the control room wants to listen on speakers while the players in the studio need headphones, and the players may want to hear a different mix than the engineer.
A dedicated mixer provides the most flexibility. Most mixers have a single headphone jack, fine for the musician recording himself or for listening to playbacks. Auxiliary outputs can be used for additional headphone mixes. Since auxiliary outputs are at line level, they need a boost in order to adequately drive headphones and that leads us to:
Headphone Amplifiers
A headphone amplifier typically has several outputs on individual headphone jacks and provides ample power to drive the headphones to near ear-piercing volume (which hopefully you won't use to its full capacity). In its simplest form, a single (usually stereo) input is amplified and sent to a few headphone jacks, each with its own volume control. Fancier headphone amplifiers have several inputs and a simple mixer, providing a custom mix for each set of headphones. For example, a singer might get a mix of the DAW tracks (mixed using the DAW program's mixer), a direct output from his mic preamp for "more me," and the output of a reverb processor for some "make me sound like I'm singing in a room, please."
Monitor Controller
A basic sound card doesn't have a handy volume control, a problem that spawned the Monitor Controller. This can be as simple as a volume control in a box connected between the sound card output and the input to a set of powered speakers. Typically a monitor controller will offer additional features such as outputs for more than one set of speakers, a headphone output with an independent volume control, inputs from multiple sources – handy for comparing the mix you're working on with a reference CD, and a Mute button for when the phone rings. It may also include a simple mixer to combine a direct input from a mic preamp or instrument with the DAW mix. It may also include meters and a function.
Talkback
You're in the control room, the band is in the studio, and you want the singer to move closer to the mic. Getting up and walking into the other room quickly gets old (the older you get). It would be convenient to speak into a mic in the control room and have your voice come through the headphones in the studio. This is what we call talkback.
Talkback is common in both recording and live consoles, so monitor controllers have started to take up that slack. Some include a built-in microphone and others have a dedicated talkback mic input which, when you push the Talkback switch, sends The Voice Of God to the headphone outputs. I've encountered one questionable design which sends the talkback mic to only the mixer's front panel headphone jack, rendering it useless if you use aux sends to feed the studio headphones (and why would you need to talk through headphones to someone standing just a headphone-cable's reach from the talkback button?).
If your a mixer isn't equipped with a talkback section, you can still talk back to the studio headphones by connecting a mic to a spare channel and adding it to the mix feeding the headphones. For this purpose, it's handy to use a mic with a built-in switch so you don't have to use the mixer's knobs to turn it off. Be aware that on many mixers, if there's a Mute button, it doesn't always mute the signal to the aux busses.
An important point about talkback is that communication goes both ways. If you're talking to a singer in the studio, you can hear what she has to say since there's a live mic in there. But if the bass player doing overdubs is plugged in to a DI without a mic on his amplifier, he can't talk to you through his bass - you'll need to set up a mic in the studio so you can hear his side of the conversation.
Can You Hear Me Yet? – Latency
Although modern computers are blindingly fast, there will always be a finite, and often significant delay between when sound goes into a digital box and when it comes out. You'll encounter this delay, known as latency, when monitoring an input through a DAW. While software and hardware designers strive to minimize latency, and a certain amount of tweaking can reduce it, it won't go away. Typically a trip through an A/D and D/A converter wired back-to-back takes 1.5 to 3 milliseconds. Put a computer in between, with drivers, a software mixer, and perhaps some plug-in signal processing and you can easily end up with ten milliseconds of latency, and even more when playing a virtual instrument.
10 milliseconds between when you play a note and hear it in the headphones is usually tolerable. Since sound travels at around 1100 feet per second, this is about like standing 10 feet away from your amplifier or stage monitor. Our brain can deal with that. But our brain works differently when jamming on stage and when concentrating on playing in the studio, and even a small amount of latency can make it difficult for a singer to get the phrasing just right.
Monitoring With Effects
If you've optimized your DAW to minimize latency and you're comfortable monitoring its output (the simplest setup), you may still want to add reverb to some elements of your mix so it sounds less sterile in the headphones. However, you only want to add reverb to the playback and not to the track you're recording because when mixdown time comes, you might want a different reverb sound. Most DAWs will allow you to insert a plug-in on the track's output so that it only appears in the monitor mix. The effect may increase the computer load and add additional latency, however. The game is to experiment to determine when latency becomes great enough to affect your performance.
Alternately, if your system includes a mixer, you can use a hardware reverb in your monitoring chain. Though you might want to use a glorious reverb plug-in for your final mix, inexpensive reverbs work just fine while tracking. A hardware reverb introduces no latency, and with few adjustments, you can get down to business quickly. Send the mic preamp's direct output to the DAW for recording and feed the reverb unit from an auxiliary send. By connecting the reverb's output to a mixer channel rather than an auxiliary return, you can route the reverb signal to the headphones via an auxiliary send as well as adding it to the control room mix.
Do-It-All Boxes
If you've been following my drift here, when you compare a basic DAW audio interface to a mixer, you'll recognize that you're missing some useful features that are taken for granted in a traditional studio - the ability to easily patch sources to tracks, access to multiple outputs from various points in the signal chain, and even the simple task of controlling the listening volume without clicking a mouse. A fair argument for some of these omissions can be made that we do things differently in a DAWville, but in recent years, manufacturers and users have come to realize the value of some of these conveniences that we've sacrificed to have a compact and affordable audio recording and production system. Today, a number of interface boxes offer, in addition to basic inputs and outputs, most of the signal routing and control room functions of a traditional mixing console.
You'll find multiple inputs - mic, line, instrument, even digital - which can be freely assigned to DAW tracks, but also appear as inputs to internal mixing buses (think auxiliary sends), with mix outputs available for control room and studio monitoring, outboard effects, or even feeding a backup recorder. There's usually a built-in headphone amplifier which may offer a separate mix for each output, and enough dedicated control room monitor outputs for surround mixing. There may even be a talkback system, insert points, MIDI ports, and possibly a built-in effect processor suitable for sweetening the monitor mix. The whole shebang connects to the computer via a single Firewire cable.
Hardware controls are limited by panel space, often consisting of little more than preamp gains and output volume controls, but with a comprehensive on-screen control panel, once you get the hang of it, you'll be pretty close to the look and feel of a real mixing console. These do-everything boxes are very capable, but it takes a very good grasp of DAW operation (and no two are the same) to stop cussing at them (Dammit! Why won't it let me send the same mix to all four headphone jacks?) and start realizing the benefits.
Taking a step further, there are familiar-looking desktop-sized mixers with computer audio I/O built in. These mixers usually aren't very flexible as to how the audio is routed to and from the computer. The most basic ones have only the main stereo mix going to a USB output, and a USB input (same connector) for playback of the stereo mix from the computer. The next step up (these tend to use Firewire due to the greater streaming efficiency) will have direct mic preamp outputs and line inputs routed to the computer for recording. Top shelf "DAW- ready" mixers offer individual track playback to the mixer channels so you can mix recorded tracks using the hardware mixer rather than the DAW mixer (or a combination of both), and some even include MIDI controls for recorder transport functions.
To bring this back around to where we started, it's now possible to get a single one or two rack space digital box that gives your computer the working tools to fairly well emulate a traditional control room, or, if you prefer, a mixer that has built-in audio I/O to the computer. There are still some loose ends and missing links, but they're getting closer with each generation.
Sidebar – Line Level Mixers and Mixer Line Inputs
Mixers were initially designed to mix microphones because that's what studios had. Line level mixer inputs came along later to accommodate multitrack recorders, effect returns, production from several sources like sound effect libraries, and musical keyboards or drum machines. We're frequently asked by people who use outboard mic preamps (or no mics at all) but have a lot of synths, why they must pay for mic preamps that they don't need. Then there are those who believe that analog mixing adds something organic to a purely digital system. Clearly there's a demand for preamp-free mixer.
There are a few line level mixers around, but they're fairly rare simply because the demand is small. But you can take a small degree of comfort in the fact that the mic preamps in today's budget priced mixers (even the particularly good sounding ones) add very little to their cost, so you're not really paying very much for something you don't think you need.
Today, the most common mixer front end is designed to accommodate both mic and line level sources. There's a conventional mic preamp circuit, and an attenuator (pad) between the line input jack and the mic preamp to bring a line level voltage down to the working range of the mic preamp. Intuitively, starting with a high level source, attenuating it to mic level, and then amplifying it back to its original level seems like it would be both inefficient and noisy. This really isn't as silly as it sounds, however.
Since the level and output impedance of an arbitrary line level source is difficult to predict (there's not standard, just a fairly large ballpark), a good line input design would call for a low (near unity) gain buffer to match the line input source to the innards of the mixer circuitry. Such a buffer doesn't cost significantly less to build than a mic preamp. Padding the mic preamp input with a few cents worth of resistors gives a balanced line level input at about the right gain and with an input impedance that will be appropriate for nearly any source. Since mic preamps are designed to be very quiet and transparent (even the cheapest of them aren't all that bad), the extra gain following the attenuated line level signal doesn't really do any harm. Purists can, and often do, use a channel insert return as a mic-pre-free line input. I've never heard anyone rave about a great improvement by connecting line level sources this way, but it makes them feel better. However, since most inserts are unbalanced, this is a potential source of increased noise.
Since most or today's line level sources are stereo it's fairly common for mixers to have a few stereo line-only channels. Stereo channels have two input jacks, but a single set of "strip" controls. The main fader adjusts the level of both inputs, the equalizer applies the same frequency response curve to both. Auxiliary buses, which are almost always mono, get the sum of the left and right channel inputs. The pan control of a stereo input works like the balance control on a home stereo receiver, with both channels at equal level in the center, the right channel being turned down as the control is turned left-of-center, and vice versa for the left channel when the control is to the right-of-center.
Stereo line level channels are great for connecting synths or bringing the output of a stereo effect processor into the mix. It's fairly common for the two input jacks to be "half normalled," allowing a mono source to be plugged into one of the jacks. In this mode, the channel works like a conventional mono channel with the pan control moving the source from left to right.
Be careful when counting channels and inputs on a mixer like this. A "12 channel" mixer might have only eight channel strips, four for mic/line inputs and four for stereo line inputs (eight channels) or four mono line inputs (four channels).
Mike Rivers has written for the audio industry over the years, including a regular column for Recording Magazine, and two books. Mike has done his share of recording over the past 50 years including several years with a remote truck, as Gypsy Studio, primarily recording folk festivals for locally produced albums and radio broadcast. Mike is currently available for on-site consulting, technical writing, and regularly covers Music Industry topics on his blog Mike Rivers - Useful Audio Stuff.
